The MySchool system has two parts. The Laravel backend is a web application that runs on your server. It provides the admin panel for managing students, courses, fees, and all school data. It also provides the API that the mobile app connects to. The Flutter mobile app is the student-facing app for Android and iOS. Students use it to check their results, fees, timetable, attendance, and more.
Inside every command, path, and settings snippet below, anything
highlighted like this is a
placeholder — an example value you must replace with your
own. File paths use the generic form
/path/to/myschool on purpose so the same
instructions work on Windows, macOS, and Linux — replace that text with
the real folder on your computer or server (for example your
web root's htdocs, www, or public_html
folder). Likewise, yourschool.com means
"your own domain". Anything not highlighted (such as
php artisan migrate) is a fixed command you type exactly as shown.
Quick Start for Non-Technical Users
Never used a terminal or command line before? This section gets your school online using only your web browser and your hosting company's control panel (usually called cPanel). It skips ahead of the detailed sections below — come back to them later if you want to customise email, payments, or branding.
A hosting plan that supports PHP 8.2+ and MySQL (most shared hosting plans from Hostinger, Namecheap, SiteGround, Bluehost, etc. do). You do not need a developer, and you do not need to install anything on your own computer.
Log in to your hosting control panel (cPanel)
Your hosting company emailed you a link and login when you bought
hosting — it usually looks like https://yourdomain.com/cpanel
or https://yourhostingprovider.com:2083. Log in with the
username and password from that email.
Create a database
In cPanel, find the icon labelled MySQL Databases (or MySQL Database Wizard). Create a new database, then create a database user and add that user to the database with All Privileges. Write down the database name, username, and password — you will need them in Step 5.
Upload and extract the MySchool files
In cPanel, open File Manager and navigate to
public_html. Upload the MySchool zip file you downloaded
from CodeCanyon using the Upload button, then right-click
the uploaded zip and choose Extract.
Move everything except the contents of the public
folder into a private folder one level above public_html
(for example, a folder named myschool). Then move the
contents of myschool/public directly into
public_html. This keeps your application code outside the
publicly accessible web folder, which is safer.
Edit the settings file
In File Manager, find the file named .env.example inside
your myschool folder, make a copy, and rename the copy to
.env. Right-click it and choose Edit to
open cPanel's built-in text editor — no separate software needed. Fill
in the database name, username, and password from Step 2, and your
website address next to APP_URL.
Run the one-time setup command
This is the only step that needs a command instead of clicking. Most modern hosts provide a Terminal icon directly inside cPanel (look for it near File Manager) — click it, then paste this one line and press Enter:
cd myschool && php artisan key:generate && php artisan migrate --seed && php artisan storage:linkThis creates the database tables, generates a security key, and adds demo data you can explore before going live.
Open a support ticket with your hosting provider and ask them to run the command above for you — this is a normal, common request and most hosts will do it free of charge within a few minutes. Alternatively, contact MySchool support through your CodeCanyon purchase page and we can walk you through it.
Log in to your admin panel
Visit https://yourdomain.com/admin in your browser and sign
in with the demo administrator account shown in the
Database Setup section below.
Change this password immediately from the admin
Settings page.
That's it — your school's admin panel is live. See the Mobile App Setup section for a visual walkthrough of what students see when they open the app for the first time.
1Requirements
Server Requirements
| Software | Minimum Version | Notes |
|---|---|---|
| PHP | 8.2 | Required. PHP 8.3 also works. |
| MySQL | 8.0 | MariaDB 10.6 or higher also works. |
| Composer | 2.x | PHP package manager. |
| Node.js | 18 | Needed to compile frontend assets. |
| npm | 9 | Included with Node.js. |
| Apache or Nginx | Any | Apache is recommended for XAMPP setups. |
Required PHP Extensions
Make sure these extensions are enabled in your php.ini:
pdo_mysql
mbstring
openssl
fileinfo
gd
curl
zip
exifCreate a file called info.php in your htdocs folder containing <?php phpinfo(); ?> and open it in your browser. Search the page for each extension name.
Mobile App Development Requirements
| Tool | Minimum Version | Required For |
|---|---|---|
| Flutter SDK | 3.10 | Both Android and iOS |
| Dart | 3.0 | Included with Flutter |
| Android Studio | Hedgehog | Android builds |
| Android SDK | API 21 (Android 5) | Android builds |
| Xcode | 15 | iOS builds only (Mac required) |
| Apple Developer Account | Paid ($99/year) | App Store submission |
2Server Setup
Copy the backend files to your server
Place the backend folder inside your web server's document root (often named htdocs, www, or public_html, depending on your hosting software). Name the folder something like myschool. Throughout this guide that location is written as /path/to/myschool — replace it with the real path on your operating system.
Install PHP dependencies
Open a terminal, navigate to the backend folder, and run:
composer install --no-dev --optimize-autoloaderIf you are setting up a development environment, omit --no-dev. This downloads all required packages into the vendor/ folder. It requires internet access and may take a few minutes.
Install Node dependencies and compile frontend assets
npm install
npm run build
This compiles the CSS and JavaScript for the admin panel. Run this once during setup, or again if you change any frontend files.
Set folder permissions
Laravel needs write access to certain folders. On Mac and Linux:
chmod -R 775 storage
chmod -R 775 bootstrap/cache
On a Linux server, also set the correct owner:
chown -R www-data:www-data storage bootstrap/cacheOn Windows with XAMPP, right-click the storage and bootstrap/cache folders and give full control to your user account.
3Database Setup
Create the database
Open phpMyAdmin at http://localhost/phpmyadmin and create a new database. Name it myschool and set the collation to utf8mb4_unicode_ci.
Or use the MySQL command line:
CREATE DATABASE myschool CHARACTER SET utf8mb4 COLLATE utf8mb4_unicode_ci;Create your environment file
On Mac and Linux:
cp .env.example .envOn Windows:
copy .env.example .envGenerate the application key
php artisan key:generateThis fills in the APP_KEY value in your .env file. Every installation must have its own unique key. Never share this key or commit it to version control.
Run the database migrations
php artisan migrateThis creates all the database tables. If any migration fails, check that your database credentials in .env are correct and the database exists.
Seed initial data
php artisan db:seedThis creates all roles, permissions, system settings, and the default admin account. When the command finishes, your terminal will display a box with the admin login credentials, like this:
==============================================
  DEFAULT ADMIN CREDENTIALS
----------------------------------------------
  Email    : admin@myschool.com
  Password : Admin@12345
----------------------------------------------
  IMPORTANT: Change this password immediately
  after your first login.
==============================================The default credentials above are the same for every installation. Anyone who has read this documentation knows them. Log in and go to your profile to change the password before doing anything else.
To load sample demo data for testing (fake students, courses, and grades):
php artisan db:seed --class=DemoDataSeederOnly run DemoDataSeeder on a test environment. It truncates existing tables before inserting fake data. Run it on production and you will lose real student records.
Manual Database Backup
Your MySchool database holds student records, grades, fees, and settings. Make a backup regularly (for example once a week, and always before a major update). The steps below use phpMyAdmin, which is available on most shared hosting panels and local setups such as XAMPP — no command line needed.
Open phpMyAdmin
On local XAMPP, open http://localhost/phpmyadmin in your browser.
On shared hosting, log in to your control panel (cPanel, hPanel, Plesk, etc.)
and open the phpMyAdmin icon.
Select your database
In the left sidebar, click the database name you created during setup
(for example myschool).
Export the database
Click the Export tab at the top. Leave the method set to
Quick and the format set to SQL, then click
Go / Export. Your browser will download a
.sql file.
Store the file safely
Save the downloaded file somewhere safe — for example an external drive or
cloud folder — and give it a clear name such as
myschool-backup-2026-08-02.sql. Keep several recent copies; do
not rely on a single file.
In phpMyAdmin, select the same database, open the Import tab,
choose your .sql file, and click Go. Restoring
overwrites current data with the backup — only do this when you intend to
roll back.
If you prefer a terminal, run the following from any folder (replace the placeholders with your database name and MySQL username):
mysqldump -u your_db_user -p myschool > /path/to/backups/myschool-backup.sqlYou will be prompted for the database password. The file is written to the backup folder you choose.
4Environment Configuration
Open the .env file in a text editor such as Visual Studio Code, Notepad++, Sublime Text, or any editor of your choice. This file controls all settings specific to your installation.
Always work on your .env copy. The .env.example file is a template for reference only.
Application Settings
APP_NAME="Your School Name"
APP_ENV=production
APP_KEY=base64:...generated automatically...
APP_DEBUG=false
APP_URL=https://yourschool.com
APP_TIMEZONE=Africa/Lagos| Key | What to set |
|---|---|
APP_NAME | Your school name. Appears in emails and browser tabs. |
APP_ENV | Set to production for a live server. Use local for development. |
APP_DEBUG | Must be false on a live server. Setting it to true exposes sensitive information. |
APP_URL | The full URL of your installation, including https://. Used by the system to generate image URLs. |
APP_TIMEZONE | Your local timezone string. See the list below. |
Common Timezone Values
| Country / Region | Timezone String |
|---|---|
| Nigeria | Africa/Lagos |
| Ghana | Africa/Accra |
| Kenya | Africa/Nairobi |
| South Africa | Africa/Johannesburg |
| United Kingdom | Europe/London |
| United States Eastern | America/New_York |
| India | Asia/Kolkata |
| UAE | Asia/Dubai |
Database Settings
DB_CONNECTION=mysql
DB_HOST=127.0.0.1
DB_PORT=3306
DB_DATABASE=myschool
DB_USERNAME=root
DB_PASSWORD=your_database_password
For XAMPP, the default username is root and the password is blank (leave DB_PASSWORD empty).
5Institution Settings
After logging into the admin panel, go to Settings > Institution Settings. These settings control what students see in the mobile app.
| Setting | Description | Example |
|---|---|---|
| Institution Name | Full legal name of your school. Appears on transcripts and the mobile app home screen. | University of Technology Maiduguri |
| Short Name | Abbreviation shown prominently on the mobile login and home screens. | UTM |
| Tagline | Optional motto shown on the public website. | Knowledge for Development |
| Currency Code | Three-letter ISO code used for fee formatting. | NGN, USD, GHS, KES |
| Currency Symbol | Symbol shown before amounts in the mobile app. | N, $, GH, KSh |
| Logo | Square PNG or JPG, minimum 512 x 512 pixels. Solid background recommended. | university-logo.png |
| Payment Portal URL | The URL the mobile "Make Payment" button opens. Can be a bank payment page, Remita, Flutterwave, or Paystack link. | https://remita.net/pay/yourschool |
After saving institution settings, the mobile app picks up the new values the next time it connects. Students do not need to update the app.
6Email Configuration
Email is required for the "Forgot Password" feature in the mobile app. Without it, students who forget their password have no way to recover their account.
General SMTP Setup
MAIL_MAILER=smtp
MAIL_HOST=smtp.yourprovider.com
MAIL_PORT=587
MAIL_USERNAME=noreply@yourschool.com
MAIL_PASSWORD=your_email_password
MAIL_ENCRYPTION=tls
MAIL_FROM_ADDRESS="noreply@yourschool.com"
MAIL_FROM_NAME="Your School Name"
Using Gmail
MAIL_MAILER=smtp
MAIL_HOST=smtp.gmail.com
MAIL_PORT=587
MAIL_USERNAME=youraccount@gmail.com
MAIL_PASSWORD=your_app_password
MAIL_ENCRYPTION=tls
MAIL_FROM_ADDRESS="youraccount@gmail.com"
MAIL_FROM_NAME="Your School Name"Go to your Google Account, then Security, then 2-Step Verification, then App Passwords. Generate a new password for Mail. Use that value for MAIL_PASSWORD, not your Gmail login password.
Testing Your Email Configuration
After setting up, test by running this in your terminal from the backend folder:
php artisan tinker
Mail::raw('Test email', function($m) { $m->to('your@email.com')->subject('MySchool Test'); });
If you receive the email, the configuration is correct. Also check your spam folder if it does not arrive within a minute.
7Payment Portal Setup
MySchool does not process payments itself. The mobile app has a "Make Payment" button that opens an external payment link. This gives your institution full control over how payments are collected and reconciled.
How It Works
When a student has an outstanding fee balance, a "Make Payment" button appears on their fee screen. Tapping it opens the payment URL you configure in your browser. After paying, the student shows their receipt to the finance office, and an admin records the payment in the admin panel.
Step by Step
Get your payment URL
Set up a payment page with any of these services commonly used in Africa and globally:
- Remita — widely used in Nigerian institutions. Go to remita.net and set up a merchant profile to get a payment link.
- Flutterwave — supports many African countries. Use their Payment Links feature at flutterwave.com.
- Paystack — popular in Nigeria and Ghana. Create a Payment Page at paystack.com/paymentpages.
- Bank payment portal — if your bank provides a web payment form for school fees, use that URL.
- Your own checkout page — if your admin panel or website has a payment form, use its URL.
Add the URL to institution settings
Log into the admin panel and go to Settings > Institution Settings. Paste the full payment URL into the Payment Portal URL field and save.
Test it
Log into the mobile app as a test student who has an outstanding balance. Go to the Fees screen and tap Make Payment. Your payment page should open in the browser.
If you leave the Payment Portal URL blank, the button still appears for students with an outstanding balance but shows a message saying to contact the finance office. No crash or error occurs.
8AI Academic Advisor Setup
The AI Academic Advisor is a 100% optional add-on. The core system — student management, admissions, course registration, fees and payments, grades and transcripts, attendance, timetables, notices, elections, the admin panel, and the mobile app — runs completely without an Anthropic or OpenAI key, and without any other paid third-party API. Every other paid integration in this guide (SMS gateways, online-class providers, and payment gateways) is optional too. The only requirements to run MySchool are the standard, free server components listed in Section 1 — Requirements (PHP, a MySQL database, and a web server). AI is added only if you want the in-app study assistant, and it can be turned off at any time with no effect on the rest of the platform.
The AI Academic Advisor is an optional feature. All other features in the mobile app and admin panel work whether or not this is configured.
The system supports two AI providers: Anthropic Claude and OpenAI. You choose which one to use in the admin panel under Settings > AI Advisor. You only need to configure one.
Option A — Anthropic Claude (Recommended)
Create an Anthropic account
Go to console.anthropic.com and sign up. Add a payment method in the billing section.
Create an API key
In the Anthropic console, go to API Keys and click Create Key. Copy the key — it starts with sk-ant-.
Add the key in the admin panel
Go to Settings > AI Advisor, set the provider to Anthropic, paste your key, and save. Or add it directly to .env:
ANTHROPIC_API_KEY=sk-ant-your-key-hereThen run: php artisan config:cache
Option B — OpenAI (ChatGPT)
Create an OpenAI account
Go to platform.openai.com and sign up. Add a payment method under Billing.
Create an API key
Go to API Keys and click Create new secret key. Copy the key — it starts with sk-.
Add the key in the admin panel
Go to Settings > AI Advisor, set the provider to OpenAI, paste your key, and choose the model (default is gpt-4o). Save the settings.
To Disable the AI Advisor
Leave both API key fields blank in the admin panel settings. When students open the AI chat screen, they will see a message that the feature is unavailable. No other features are affected.
Estimated Cost
For a school of 500 students each sending 10 AI messages per day, the cost is typically under $5 per month with either provider. Monitor your actual usage in the respective console dashboard and set a spending limit to avoid unexpected charges.
9SMS Notifications Setup
SMS notifications are optional. When configured, the system can send text messages to students for password resets, fee reminders, and important notices. All other features work without SMS.
Configure your SMS provider in the admin panel under Settings > SMS Gateway. Three providers are supported.
Africa's Talking
Recommended for Nigeria, Kenya, Ghana, Uganda, Tanzania, and most of Africa. Sign up at africastalking.com and create an application to get your API key and username.
| Setting | Where to find it |
|---|---|
africas_talking_api_key | Africa's Talking dashboard > Settings > API Key |
sms_africas_talking_username | Your application username. Use sandbox for testing. |
sms_africas_talking_environment | Set to sandbox for testing, production for live. |
Twilio
Supported worldwide. Sign up at twilio.com and get a phone number from the console.
| Setting | Where to find it |
|---|---|
sms_twilio_account_sid | Twilio Console > Account Info |
sms_twilio_auth_token | Twilio Console > Account Info |
sms_twilio_from | Your Twilio phone number (e.g. +12015551234) |
UGSMS (Uganda)
A local SMS gateway for Uganda. Sign up at ugsms.ug.
| Setting | Description |
|---|---|
sms_ugsms_api_key | Your UGSMS API key from the dashboard. |
sms_ugsms_sandbox | Set to true for testing, false for live sending. |
After saving your settings, use the Test button in the admin panel SMS settings page. It sends a test message to the number you enter. Confirm delivery before going live.
10Online Class Integrations
The system integrates with seven video conferencing platforms. Choose the one your institution already uses or prefers. Only one needs to be configured. All are optional — if none is configured, administrators can still add a meeting URL manually when scheduling a class.
Configure your preferred provider in the admin panel under Settings > Online Classes.
Jitsi Meet (Free — Recommended)
Jitsi Meet is free and requires no account for basic use. The public server at meet.jit.si works immediately with no API key. For a private Jitsi server (JaaS), enter your domain and JWT credentials.
| Setting | Description |
|---|---|
online_jitsi_domain | Leave as meet.jit.si for the public server, or enter your self-hosted domain. |
online_jitsi_app_id | JaaS App ID. Leave blank if using the public server. |
online_jitsi_jwt_secret | JaaS JWT secret. Leave blank if using the public server. |
Daily.co
Sign up at daily.co and create a room. Copy your API key from the dashboard.
| Setting | Description |
|---|---|
online_daily_api_key | Your Daily.co API key. |
online_daily_domain | Your Daily.co subdomain (the part before .daily.co). |
Zoom
Create a Server-to-Server OAuth app in your Zoom Marketplace developer account to get your credentials.
| Setting | Description |
|---|---|
online_zoom_account_id | Your Zoom Account ID. |
online_zoom_client_id | OAuth App Client ID. |
online_zoom_client_secret | OAuth App Client Secret. |
Google Meet
Requires a Google Workspace account. Create a Service Account in Google Cloud Console, enable the Google Calendar API, and download the JSON credentials file. Paste the entire JSON content into the setting field.
| Setting | Description |
|---|---|
online_meet_service_account_json | The full JSON content of your Google service account credentials file. |
Microsoft Teams
Register an app in the Azure Active Directory portal. Grant it the OnlineMeetings.ReadWrite.All permission.
| Setting | Description |
|---|---|
online_teams_tenant_id | Your Azure Tenant ID. |
online_teams_client_id | Your Azure App Client ID. |
online_teams_client_secret | Your Azure App Client Secret. |
Whereby
Sign up at whereby.com. Go to the Embedded section in your dashboard and create an API key.
| Setting | Description |
|---|---|
online_whereby_api_key | Your Whereby Embedded API key. |
BigBlueButton (Self-Hosted)
BigBlueButton is an open-source video conferencing platform designed for education. It requires a self-hosted server.
| Setting | Description |
|---|---|
online_bbb_url | Your BigBlueButton server URL (e.g. https://bbb.yourschool.com/bigbluebutton/). |
online_bbb_secret | Your BigBlueButton shared secret. Run bbb-conf --secret on your BBB server to find it. |
11File Storage Setup
Uploaded files such as study materials, profile photos, and the institution logo are stored in storage/app/public. You must create a storage link so these files are accessible from the web.
Create the Storage Link
Run this command once after installation:
php artisan storage:linkThis creates a symbolic link from public/storage to storage/app/public. If you skip this step, uploaded images will not display in the app or admin panel.
Amazon S3 (Optional)
For production installations with many file uploads, storing files on Amazon S3 is recommended. Add these values to your .env:
FILESYSTEM_DISK=s3
AWS_ACCESS_KEY_ID=your_key_id
AWS_SECRET_ACCESS_KEY=your_secret_key
AWS_DEFAULT_REGION=us-east-1
AWS_BUCKET=your_bucket_name12Running the Application
XAMPP (Local Development)
Start the Apache and MySQL modules in the XAMPP control panel. Then open your browser and go to:
http://localhost/myschool/publicYou should see the login screen. Log in with the admin credentials that were shown after running the database seeder.
Apache Virtual Host (Production)
/path/to/myschool and yourschool.com are generic placeholders. Replace them with the real project folder on your server and your own domain. Use the path format that matches your operating system and host — do not copy a path from another machine.
Create a virtual host configuration file pointing to the public/ folder:
<VirtualHost *:80>
    ServerName yourschool.com
    DocumentRoot /path/to/myschool/public

    <Directory /path/to/myschool/public>
        AllowOverride All
        Require all granted
    </Directory>
</VirtualHost>
Enable mod_rewrite and restart Apache. Make sure the public/.htaccess file is present — it handles URL routing.
Nginx (Production)
server {
    listen 80;
    server_name yourschool.com;
    root /path/to/myschool/public;
    index index.php;

    location / {
        try_files $uri $uri/ /index.php?$query_string;
    }

    location ~ \.php$ {
        fastcgi_pass unix:/path/to/php-fpm.sock;
        fastcgi_param SCRIPT_FILENAME $realpath_root$fastcgi_script_name;
        include fastcgi_params;
    }
}
Performance Caching (Production Only)
Run these commands on your live server to improve response times:
php artisan config:cache
php artisan route:cache
php artisan view:cacheIf you change any setting in .env after running config:cache, you must run php artisan config:cache again or the old values remain cached.
Shared Hosting / cPanel
Many buyers deploy on shared hosting (Namecheap, Hostinger, SiteGround, etc.) where you cannot run a terminal as root. Follow these steps:
Upload files to the correct location
Shared hosting usually gives you a public_html folder. You need to place the Laravel files outside of public_html and only the contents of the public/ folder inside it.
Upload the entire project to a folder called myschool at the same level as public_html. Then copy or move the contents of myschool/public/ into public_html/.
Update the path in index.php
Open public_html/index.php and update the two paths to point to your project folder:
require __DIR__.'/../myschool/vendor/autoload.php';
$app = require_once __DIR__.'/../myschool/bootstrap/app.php';Run Composer via cPanel Terminal or SSH
Most modern shared hosts provide a Terminal in cPanel or allow SSH access. Navigate to your project folder and run:
cd ~/myschool
composer install --no-dev --optimize-autoloader
php artisan key:generate
php artisan migrate --seed
php artisan storage:link
If your host does not allow Composer, run it locally and upload the vendor/ folder via FTP. This is slower but works.
Set folder permissions via cPanel File Manager
Right-click the storage and bootstrap/cache folders in cPanel File Manager. Choose Change Permissions and set them to 755 recursively.
Most shared hosts do not have Node.js. Run npm install && npm run build on your local computer first, then upload the generated public/build/ folder to the server.
13Queue Worker and Scheduled Tasks
The system uses Laravel queues to process background jobs such as sending emails and notifications without slowing down the web request. The scheduler handles recurring tasks. Both need to be running for the system to work correctly.
Queue Driver
The default queue driver is database. This is set in your .env file and works out of the box with no extra software. For high-traffic installations, Redis is faster but requires a Redis server.
QUEUE_CONNECTION=databaseRunning the Queue Worker
The queue worker processes background jobs. On a VPS or dedicated server, start it and keep it running:
php artisan queue:work --tries=3 --timeout=60To keep the worker running permanently even after a server reboot, use a process manager like Supervisor. Create a config file in your Supervisor configuration directory (commonly under the system's Supervisor conf.d folder), for example /path/to/supervisor/conf.d/myschool-worker.conf:
[program:myschool-worker]
process_name=%(program_name)s_%(process_num)02d
command=php /path/to/myschool/artisan queue:work --tries=3 --timeout=60
autostart=true
autorestart=true
numprocs=1
user=www-data
redirect_stderr=true
stdout_logfile=/path/to/logs/myschool-worker.log
Then run:
sudo supervisorctl reread
sudo supervisorctl update
sudo supervisorctl start myschool-worker:*
Cron Job (Scheduler)
Add a single cron entry to your server that runs every minute. This triggers all scheduled tasks defined in the application.
On Linux/Mac, open your crontab with crontab -e and add:
* * * * * cd /path/to/myschool && php artisan schedule:run >> /dev/null 2>&1On cPanel, go to Cron Jobs and add a new job. Set the time fields all to * (every minute) and use this command:
cd /path/to/myschool && php artisan schedule:run >> /dev/null 2>&1The queue worker caches application code when it starts. After deploying any code update, restart the worker so it picks up your changes:
php artisan queue:restart14Mobile App Setup
Install Flutter
Download Flutter from flutter.dev/docs/get-started/install and follow the instructions for your operating system. After installation, verify everything is working:
flutter doctorFix any issues shown before continuing. All items should show a checkmark.
Open the project and install packages
Navigate to the Flutter project folder in your terminal and run:
flutter pub getThis downloads all required Dart packages.
Connect the app to your backend
The app does not have a hardcoded server URL. When a student opens the app for the first time, they see a Server Setup screen. Enter the full URL of your backend.
Examples:
- Local XAMPP:
http://192.168.1.100/myschool/public - Production:
https://yourschool.com
"localhost" on a phone refers to the phone itself, not your computer. Use your computer's local IP address (e.g. 192.168.1.5). On Mac, find it in System Settings > Network. On Windows, run ipconfig in Command Prompt.
Run on a device or emulator
flutter runSelect your connected device or emulator when prompted. The app should open and show the Server Setup screen on first launch.
How the App Communicates with the Backend
The app never talks to your database directly — every screen is powered by a JSON request to the Laravel API over HTTPS. This diagram shows the full exchange, from the first connection check through login to a normal authenticated screen load:

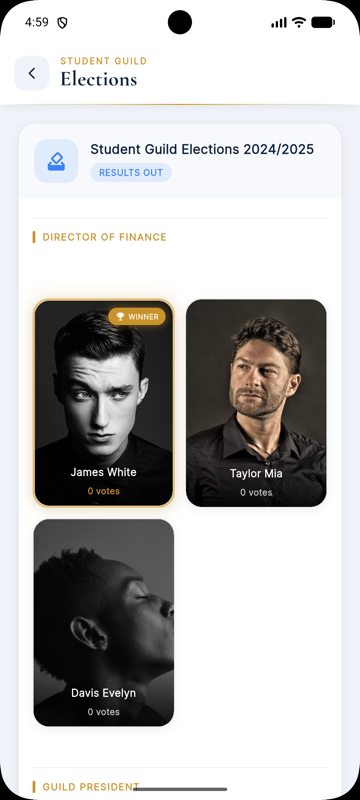
Visual Walkthrough — First Login and Setup
What a student sees the first time they open the app, in order:


15Changing the App Bundle ID
The default identifier is com.myschool.app. If two buyers distribute with the same identifier, their apps conflict on devices and app stores. You must change it to your own unique identifier before building for distribution.
A bundle identifier uses the format com.yourorganisation.appname. Use only lowercase letters, numbers, and dots. No spaces or special characters.
Android
Open android/app/build.gradle.kts in a text editor and change:
applicationId = "com.myschool.app"to your identifier:
applicationId = "com.universityofmaiduguri.portal"iOS
Open Xcode by double-clicking ios/Runner.xcworkspace. In the left panel, select Runner. Click the Signing and Capabilities tab. Change the Bundle Identifier field.
Alternatively, open ios/Runner.xcodeproj/project.pbxproj in a text editor and replace every occurrence of com.myschool.app with your identifier.
Changing the App Name
Android — open android/app/src/main/res/values/strings.xml:
<string name="app_name">Your School Portal</string>iOS — open ios/Runner/Info.plist and update both:
<key>CFBundleDisplayName</key>
<string>Your School Portal</string>
<key>CFBundleName</key>
<string>Your School Portal</string>16Building the Mobile App
Android APK (Direct Installation)
flutter build apk --releaseThe APK is saved to build/app/outputs/flutter-apk/app-release.apk. You can send this file directly to students to install.
Android App Bundle (Google Play)
First, create a release signing keystore. You only need to do this once. Store the file safely — you need the same keystore for every future update:
keytool -genkey -v -keystore release.jks -alias myschool \
  -keyalg RSA -keysize 2048 -validity 10000
Then build with your keystore:
KEYSTORE_PATH=/path/to/release.jks \
KEYSTORE_PASSWORD=your_keystore_password \
KEY_ALIAS=myschool \
KEY_PASSWORD=your_key_password \
flutter build appbundle --release
The App Bundle is saved to build/app/outputs/bundle/release/app-release.aab.
iOS IPA (App Store or TestFlight)
iOS builds require a Mac with Xcode and a paid Apple Developer account ($99 per year).
flutter build ipa --releaseOpen build/ios/archive/Runner.xcarchive in Xcode Organizer to distribute to the App Store or TestFlight.
The app is configured to allow HTTP connections so buyers can connect to servers without SSL. If your server uses HTTPS only, open ios/Runner/Info.plist and set NSAllowsArbitraryLoads to false before submitting to the App Store. This avoids potential Apple review questions.
17Customising App Branding
App Icon
Replace assets/myschool.png with your institution logo. Requirements:
- Square format (equal width and height)
- At least 512 x 512 pixels
- PNG format with a solid background (not transparent)
After replacing the file, regenerate all icon sizes:
dart run flutter_launcher_iconsRebuild the app after running this command.
Colours
Open lib/theme/app_theme.dart in your text editor. The main brand colours are defined in the AppColors class:
static const navy      = Color(0xFF0F2040);
static const navyMid   = Color(0xFF1A3560);
static const gold      = Color(0xFFC9922A);
static const goldLight = Color(0xFFE8B84B);
static const goldDark  = Color(0xFFA87820);
Change the hex values to your institution's colours. The gold and goldLight values are used most visibly for buttons, highlights, and the navigation bar. Rebuild the app after saving.
Dark and Light Theme
The app ships with both a dark and light theme. Students can switch between them from the Settings screen inside the app. No code change is needed to enable this — it works out of the box.
Institution Name and Logo in the App
The school name, abbreviation, logo, and currency shown in the mobile app come from your backend settings, not from the app code. Update them in the admin panel under Settings > Institution Settings. The app fetches this data from the server automatically on each launch.
18User Roles and Staff Accounts
The system has six built-in roles. Each role has its own dashboard and can only access the areas relevant to their job. The Super Admin creates all staff accounts from the admin panel under Users > Add User.
| Role | What they can do | Login portal |
|---|---|---|
| Super Admin | Full access to everything. Manages all users, settings, academic sessions, departments, and system configuration. | /admin/dashboard |
| Registrar | Manages course registrations, admissions applications, and student enrolment. Can view timetables and student records. | /registrar/dashboard |
| HOD (Head of Department) | Approves grades submitted by lecturers in their department. Views department-level reports and student wellbeing data. | /hod/dashboard |
| Accountant | Records fee payments, manages fee structures, and generates financial reports. Cannot access academic records. | /finance/dashboard |
| Lecturer | Takes attendance, enters and submits grades for their allocated courses, uploads class materials, and schedules online classes. | /lecturer/dashboard |
| Student | Access via the Flutter mobile app only. Views results, fees, timetable, materials, and all student-facing features. | Mobile app |
Creating a Staff Account
Go to Users in the admin panel
Log in as Super Admin and navigate to Users > All Users, then click Add User.
Fill in the account details
Enter the staff member's name, email address, and a temporary password. Select the appropriate role from the dropdown.
For Lecturers — link to a Lecturer profile
A lecturer user account must be linked to a Lecturer profile record. After creating the user account with the Lecturer role, go to Academic > Lecturers and either create a new lecturer record or edit an existing one to link it to the user account. Without this link, the lecturer cannot see their allocated courses.
Creating a Student Account
Student accounts are created by the Super Admin or Registrar from Students > Add Student. The student's login credentials are set during account creation. Students log in through the mobile app only — they do not have access to the web admin panel.
The public website includes an online application form at /apply. Prospective students fill it in and submit. The Registrar reviews submitted applications under Admissions in the admin panel and can convert an approved application into a student account with one click.
19Admin Panel Overview
| Section | What You Can Do |
|---|---|
| Dashboard | Overview of total students, fees collected, active sessions, and recent activity. |
| Academic | Manage academic sessions, semesters, departments, programmes, courses, course allocations, and the class timetable. |
| Students | Add, edit, and search students. Assign them to programmes and departments. Reset passwords. View individual records. |
| Lecturers | Manage lecturer accounts. Lecturers have their own portal to enter grades, take attendance, and upload materials. |
| Finance | Create fee structures per programme and session. Record payments. Generate payment reports. |
| Online Classes | Schedule virtual class sessions with meeting URLs. Students see these in the mobile app's Online Classes screen. |
| Materials | Upload lecture notes, slides, and videos. Attach them to courses. Students open them from the mobile app. |
| Assignments | Create assignments with due dates and maximum scores. Students view them in the mobile app. |
| Discussions | View and moderate forum threads that students start through the mobile app. |
| Elections | Create student government elections with positions and candidates. Students vote through the mobile app. |
| Notices | Post school-wide announcements. Mark as urgent for priority display at the top of the app. |
| Admissions | Review online applications submitted through the public /apply page. Approve or reject applicants and convert approved ones to student accounts. |
| Wellbeing | View student wellbeing survey responses. Identify students who may need academic or pastoral support based on their responses. |
| Public Website | The backend powers a public-facing website at your root URL with pages for Home, Programmes, News, About, and Contact. News articles posted from the admin panel appear here automatically. |
| Transcript Verification | Each student transcript includes a unique verification code. Third parties can verify a transcript's authenticity by visiting /verify/{code} on your backend URL. |
| Settings | Configure institution details, payment URL, currency, AI provider, SMS gateway, online class provider, roles, permissions, and user accounts. |
Admin Panel Screenshots
The admin panel ships with a dark, responsive interface. The screenshots below are taken from the bundled demo data so you can see exactly what each screen looks like after a fresh install.


20API Reference (For Developers)
The mobile app talks to the backend over a small, stateless JSON API. This section documents every endpoint so developers can extend the system, build additional clients, or integrate with other software. The web admin panel uses standard server-rendered Laravel routes and is not part of this API.
Base URL
All endpoints are served under the /api prefix of your backend installation:
https://your-backend-domain.com/apiReplace your-backend-domain.com with wherever you deployed the Laravel backend.
Authentication
Authentication is token based. A client first calls POST /api/auth/login with an email and password. On success the response contains a Bearer token (stored in the api_token column on the user). Send that token in the Authorization header on every protected request:
Authorization: Bearer <your-token>
Accept: application/json
Content-Type: application/json
Protected routes are guarded by the auth.api middleware. A missing or invalid token returns 401 Unauthorized.
Public Endpoints
| Method | Endpoint | Description |
|---|---|---|
GET | /api/institution | Returns the institution name, abbreviation, tagline, location, currency, and logo. Used by the app's Server Setup screen to confirm the backend URL is reachable. |
POST | /api/auth/login | Authenticates a user. Body: email, password. Returns the Bearer token and the user profile. |
POST | /api/payments/webhook | Public webhook endpoint that the payment gateway calls to confirm a fee payment. Not called by the mobile app directly. |
Authenticated Endpoints
| Method | Endpoint | Description |
|---|---|---|
POST | /api/auth/logout | Invalidates the current Bearer token. |
GET | /api/student/dashboard | Summary cards for the logged-in student: fees, attendance, upcoming classes, and quick stats. |
GET | /api/student/profile | Full profile for the logged-in student. |
GET | /api/student/courses | Courses the student is registered for in the active session. |
GET | /api/student/registration | Course-registration status for the active session. |
POST | /api/student/registration/register | Registers the student for one or more courses. |
GET | /api/student/fees | Fee structure, amounts paid, and outstanding balance. |
GET | /api/student/results | Published grades and results. |
GET | /api/student/timetable | Weekly class timetable. |
GET | /api/student/attendance | Attendance records for the student. |
POST | /api/student/attendance/scan | Marks attendance by scanning a class QR code. |
GET | /api/student/assignments | Assignments for the student's courses. |
GET | /api/student/materials | Downloadable class materials. |
GET | /api/student/online-classes | Scheduled online classes and their join links. |
GET | /api/student/id-card | Digital student ID-card data (including QR payload). |
GET | /api/student/notices | Published notices for the student body. |
GET | /api/student/notifications | Personal notifications for the logged-in student. |
GET | /api/student/discussions | Course discussion threads. |
GET | /api/student/elections | Active and past student elections. |
POST | /api/student/elections/{id}/vote | Casts a vote in the given election. |
POST | /api/student/ai/chat | Sends a message to the optional AI Academic Advisor and returns its reply. Only active when an AI provider is configured (see Section 8). |
Example — Log In
POST /api/auth/login
Content-Type: application/json

{
  "email": "student@myschool.demo",
  "password": "your-password"
}
A successful response returns a token you then attach to every protected call:
GET /api/student/dashboard
Authorization: Bearer <token-from-login>
Accept: application/jsonAll API routes are defined in routes/api.php. Controllers are in app/Http/Controllers/API/ (and app/Http/Controllers/AI/ for the advisor). To add your own endpoint, register it in routes/api.php, protect it with the auth.api middleware if it needs a signed-in user, and return a JSON response. Run php artisan route:list --path=api at any time to print the live list of endpoints from your own installation.
21Common Problems and Solutions
Check that Apache and MySQL are running in XAMPP. If testing on a phone, use your computer's local IP address, not "localhost". The URL must not have a trailing slash. Verify the public/.htaccess file exists. On XAMPP, confirm mod_rewrite is enabled in the Apache configuration.
The storage link has not been created. Run:
php artisan storage:linkThen upload a logo in the admin panel under Settings > Institution Settings.
Your database credentials in .env are incorrect. Check DB_USERNAME and DB_PASSWORD. For XAMPP, the default is username root with a blank password. Also confirm the database you named in DB_DATABASE actually exists in phpMyAdmin.
Confirm that minSdk = 21 is set in android/app/build.gradle.kts. The QR code scanner requires Android API level 21 minimum. Also check that the camera permission is declared in AndroidManifest.xml.
Verify your mail settings in .env. For Gmail, you must use an App Password, not your regular Gmail password (see Section 6). Also check the student's spam folder. To test, run:
php artisan tinker
Mail::raw('Test', function($m) { $m->to('test@email.com')->subject('Test'); });The storage link is missing. Run php artisan storage:link. Also confirm that the storage/app/public folder is writable by the web server user.
Either ANTHROPIC_API_KEY is missing from .env, the key is invalid, or your Anthropic account has run out of credits. Check your balance at console.anthropic.com. All other app features work without the AI key.
If you ran php artisan config:cache at any point, you must run it again after every .env change:
php artisan config:cacheReplacing the PNG alone is not enough. You must regenerate the icons and rebuild:
flutter pub run flutter_launcher_icons
flutter build apk --release
The Payment Portal URL has not been set. Go to the admin panel, Settings > Institution Settings, and paste your payment page URL into the Payment Portal URL field. Save and the button will work immediately for students.
Final Checklist Before Going Live
Work through every item on this list before giving students access to the system.
- APP_DEBUG is set to false in .env
- APP_URL is set to the live HTTPS URL
- APP_TIMEZONE is set to your local timezone
- QUEUE_CONNECTION is set to database in .env
- The default admin password has been changed
- Institution name, abbreviation, logo, and currency are configured in the admin panel
- Email is configured and a test email was received
- php artisan storage:link has been run
- All database migrations ran without errors
- A manual database backup has been downloaded and stored safely (see Database Backup)
- php artisan config:cache and route:cache have been run on the production server
- The cron job for php artisan schedule:run has been added to the server
- The queue worker is running (Supervisor or cPanel cron)
- Lecturer accounts have been created and linked to Lecturer profile records
- Finance, HOD, and Registrar accounts have been created with correct roles
- The mobile app connects successfully to the production server URL
- The app bundle identifier has been changed from com.myschool.app
- The app icon has been replaced with your institution logo
- dart run flutter_launcher_icons has been run after replacing the icon
- A release signing keystore has been created and stored safely (Android)
- The Payment Portal URL has been set if your institution accepts online payments
- The AI Advisor API key is configured (Anthropic or OpenAI) if the feature is needed
- SMS gateway is configured if SMS notifications are needed
- Online class provider is configured if virtual classes will be used
Credits & Third-Party Licenses
MySchool is built on top of the open-source components listed below. Every one of them
is distributed under a permissive licence (MIT, BSD, Apache 2.0 or the SIL Open Font
Licence) that allows redistribution inside a commercial product. The licence texts
ship with each package (in vendor/ for the backend and the pub cache for
the mobile app); the summaries here are provided for convenience.
All third-party code, fonts, and icons used in MySchool are free for commercial use. You do not need to purchase any additional licence to sell or deploy a product built on MySchool. Please keep the original licence/copyright notices intact inside the dependency folders.
Backend — PHP packages (Composer)
| Package | Purpose | Licence |
|---|---|---|
| laravel/framework | Core application framework | MIT |
| laravel/fortify | Authentication backend | MIT |
| laravel/tinker | Artisan REPL | MIT |
| livewire/livewire | Dynamic server-rendered UI | MIT |
| spatie/laravel-permission | Roles & permissions | MIT |
| barryvdh/laravel-dompdf | PDF generation (wraps dompdf, LGPL-2.1) | MIT |
| intervention/image | Image processing (logos, ID cards) | MIT |
| maatwebsite/excel | Excel/CSV export (wraps PhpSpreadsheet, MIT) | MIT |
| aws/aws-sdk-php | Optional Amazon S3 file storage | Apache-2.0 |
| openai-php/laravel | Optional OpenAI AI Advisor | MIT |
Backend — front-end build tools (npm)
| Package | Purpose | Licence |
|---|---|---|
| tailwindcss | CSS framework | MIT |
| alpinejs (+ collapse, focus, intersect) | Lightweight interactivity | MIT |
| vite / laravel-vite-plugin | Asset bundling | MIT |
| apexcharts | Dashboard charts | MIT |
| axios | HTTP requests | MIT |
| qrcode | QR code generation | MIT |
| postcss / autoprefixer | CSS post-processing | MIT |
Mobile app — Flutter / Dart packages (pub.dev)
| Package | Purpose | Licence |
|---|---|---|
| flutter SDK | Mobile app framework | BSD-3-Clause |
| google_fonts | App typography | Apache-2.0 |
| http | API communication | BSD-3-Clause |
| shared_preferences | Local token/setting storage | BSD-3-Clause |
| intl | Date/number formatting | BSD-3-Clause |
| mobile_scanner | Attendance QR scanning | BSD-3-Clause |
| url_launcher | Opening external links | BSD-3-Clause |
| qr_flutter | Student ID QR rendering | BSD-3-Clause |
| cupertino_icons | iOS-style icons | MIT |
| flutter_lints (dev) | Lint rules | BSD-3-Clause |
| flutter_launcher_icons (dev) | App icon generation | MIT |
| Project Nayuki QR Code generator | Bundled in lib/vendor/ for attendance QR | MIT |
Fonts & icons
| Asset | Source | Licence |
|---|---|---|
| Cormorant Garamond, Inter, Poppins, Space Mono | Google Fonts | SIL Open Font Licence 1.1 |
| Heroicons (inline SVG paths used throughout the UI) | heroicons.com | MIT |
The bundled myschool.png logo and any demo imagery are placeholders
created for this item. Replace them with your own institution branding before going
live, as described in the Branding section.
Changelog
Version history for the MySchool backend and mobile app. Both are versioned together.
Documentation update: generic cross-platform path placeholders and a short manual database backup guide for non-technical users.
Initial public release.
- Laravel 11 backend with role-based access (Super Admin, Admin, Accountant, HOD, Registrar, Lecturer, Student).
- Academic management: departments, programmes, courses, sessions, timetables, course allocation and registration.
- Finance: fee structures, online payments (Stripe, Flutterwave, Paystack, PawaPay, DPO, Orange Money), receipts and statements.
- Grading, transcripts and HOD grade approval workflow.
- Attendance with QR scan-in, assignments, study materials, notices, discussions and student elections.
- Online classes via Jitsi, Daily.co, Zoom, Google Meet, Microsoft Teams, Whereby and BigBlueButton.
- Optional AI Academic Advisor (Anthropic Claude or OpenAI).
- SMS notifications via Africa's Talking, Twilio and UGSMS.
- Companion Flutter student app (Android & iOS) with configurable server URL.
Support and Contact
If you run into any issues during installation or setup that are not covered in this guide, you can reach the developer directly using any of the channels below. Please include your CodeCanyon purchase code when making contact so your request can be verified and handled quickly.
Send a detailed description of your issue along with any error messages you are seeing. Include your server type (XAMPP, Apache, Nginx) and PHP version.
Message on WhatsApp for faster responses. Available Monday to Friday. Send a screenshot of any error together with your message for a quicker resolution.
What to Include in Your Support Request
To get help as quickly as possible, provide the following information when you make contact:
- Your CodeCanyon purchase code (found in your Envato account under Downloads)
- The step in this guide where the problem occurred
- The exact error message shown in your browser or terminal
- Your server environment: XAMPP, shared hosting, VPS, or cloud server
- Your PHP version (run
php -vin terminal to check) - Your operating system: Windows, Mac, or Linux
You can also open a formal support ticket directly on the item's CodeCanyon page. Go to your Envato account, find MySchool under your purchases, and click the Support tab. This creates a tracked ticket with a guaranteed response time.